Mô tả

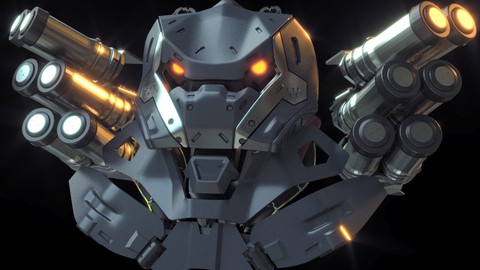
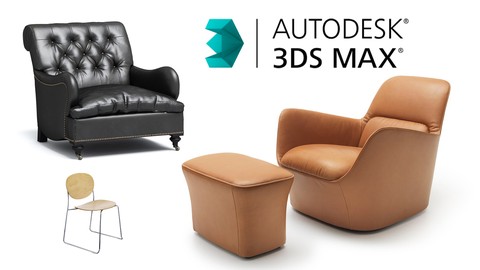
In this course you will learn how to work with polygon, sculpting, and CAD programs to get the best of all worlds. There is a strong emphasis on using the strongest aspects of all programs to get the most out of your 3D design experience. You will learn to work at a good level in 3D Studio Max, Blender, Zbrush, and Plasticity. You will learn how how sculpt in Zbrush and take advantage of Zbrush's fluid and responsive dynamesh system to quickly explore your design in the initial stages. You will also learn how to quickly paint and set up a color scheme while you are still in the sculpting phase. Then, you will learn how to retopologize and continue your design in 3DS Max and Blender. After creating cleaner simpler film asset topology you will learn how to further refine, define, and detail your object to a high standard. Finally, you will learn how to export your subdivision mesh to MoI and Plasticity to add crisp and clean CAD details. At the end of this course you will have a good grasp on modeling a wide variety of objects, from organic brains to faces to mechanical legs and weapons and you will be able to create a creature or mech that has a good mix of fleshy parts as well as sleek and sharp hard surface objects.

Bạn sẽ học được gì

Learn how to retopologize, model, and design a mechanical character with 3DS Max.

Learn how to retopologize, model, and design a mechanical character with Blender.

Learn how to sculpt in Zbrush at a basic level.

Learn how to integrate CAD/NURBS into your designs. Plasticity(beta) is used for this course.

Yêu cầu

  • Make sure you have your poly-modeling program of choice installed. Although I used Max and Blender you can also use Modo, NVil, Cinema4D, XSI, or anything else that can handle poylgon modeling. I also recommend a tablet for sculpting. For sculpting software you can use Blender or Zbrush. For CAD I recommend Plasticity which is currently in beta and is free and when it is released will be very affordable. Shapr3D and Fusion 360 are also good choices.

Nội dung khoá học

15 sections

Program Introductions

11 lectures
Intro to Blender
48:26
Setting up Max
09:01
Intro to Max 1
01:07:27
Intro to Max 2 (Hotkeys 1)
30:00
Intro to Max 3 (Hotkeys 2)
31:44
Intro to Plasticity
28:44
Intro to Zbrush
44:03
Intro to Moment of Inspiration (MoI)
40:47
Intro to MoI 2
35:06
Exporting Poly to CAD
19:29
Working Poly to CAD
18:40

3DS Max

35 lectures
Cool Shapes
18:34
Freeform Modeling 1
37:09
Freeform Modeling 2
25:01
Fun with Symmetry
19:13
Integrating Objects Together
33:24
Working at an Angle Part 1
21:16
Working at an Angle Part 2
16:19
Practicing Working at an Angle
36:14
Angular Freeform
20:03
Freeform Intro Part 1
30:29
Freeform Intro Part 2
23:43
Freeform Intro Part 3
16:29
Combining Angular and Freeform
43:25
Inserting and Cutting Patterns
36:06
Happy Accidents Part 1
36:36
Happy Accidents Part 2
34:36
Split Mesh and Low Density Modeling Part 1
31:00
Split Mesh and Low Density Modeling Part 2
26:19
Auto-Crease Workflow Demonstration
24:34
Auto-Crease Workflow and Freeform Retopology
27:20
Design with Shapes and Colors - Part 1
14:59
Design with Shapes and Colors - Part 2
10:58
Ornament Modeling - Part 1
20:01
Ornament Modeling - Part 2
24:23
Ornament Modeling - Part 3
30:22
Tiling Sofa Geometry
17:30
Working with Splines - Part 1
16:29
Working with Splines - Part 2
19:46
Advanced Detailing - Part 1
19:16
Advanced Detailing - Part 2
15:52
Model, Unwrap, and Texture Straps
13:14
Fitting Objects Together
17:54
Set Flow Bridging
09:07
More Freeform
20:11
Fixing Really Messy Topology
10:37

Blender

12 lectures
1. Angular Freeform
38:36
More Angular Freeform
17:24
Even More Angular Freeform
20:53
2. Freeform Modeling
24:20
3. Basic Armor Modeling
19:57
4. Easier Freeform Design with Quad Remesher
28:51
5. Detailing After Remesher
18:40
Cyber Samurai Part 1
31:20
Cyber Samurai Part 2
50:36
Cyber Samurai Part 3
21:45
Bulgarov Style in Blender 1
22:12
Bulgarov Style in Blender 2
15:59

Zbrush

15 lectures
Create and Modify Alphas
17:26
Create Hard Surface Alphas
08:27
Mouth Layers
16:32
Insert Multi Mesh - Part 1
13:47
Insert Multi Mesh - Part 2
19:05
Insert Multi Mesh - Part 3
10:27
Mesh Fusion for Hard Surface and Organic Modeling
14:02
Sculpting Eyes
19:56
Create Ornamental Alpha
15:51
Organic Sculpting Tips
25:50
Head Sculpt - Part 1
20:06
Head Sculpt - Part 2
16:58
Head Sculpt - Part 3
14:39
Rock Sculpting - Part 1
24:36
Rock Sculpting - Part 2
23:19

Zbrush Hard Surface

13 lectures
Part 1
19:04
Part 2
17:26
Part 3
12:50
Part 4
11:22
Part 5
16:36
Part 6
20:51
Part 7
20:32
Part 8
16:53
Part 9
17:21
Part 10
15:40
Part 11
17:24
Part 12
13:25
Part 13
17:13

Project: Cyber Brain Spider (Blender + Zbrush + Plasticity)

11 lectures
Zbrush Part 1 (Base Sculpt)
25:40
Blender Part 1 (Retopology)
35:28
Blender Part 2
35:35
Plasticity Part 1 (Leg)
01:01:32
Blender Part 3
49:20
Plasticity Part 2 (Weapon)
39:51
Zbrush Part 2 (Sculpt Refinement)
28:08
Kitbashing Created Assets
11:34
Blender Part 4
43:15
Blender Part 5
36:11
Blender Part 6
21:01

Project: Prosthetic Arm (Max and Plasticity)

8 lectures
1. Zbrush and Initial Modeling
21:23
2. Neutral Modeling Position
18:32
3. The Design Comes Together
47:19
4. Further Designing
37:54
5. Hand in Max
25:00
6. Hand in CAD Part 1
25:00
7. Hand in CAD Part 2
50:08
8. Kitbashing Joints
27:35

Project: Big Boy (Zbrush + Max + Plasticity)

8 lectures
1. Polygon Kitbash
37:19
2. Poly to Sculpt
17:45
3. Cad Part 1 (Initial Cuts)
23:02
4. Cad Part 2 (Detailing)
37:56
5. Cad Part 3 (Refining)
25:37
6. More Kitbashing After CAD
22:50
7. Armor Plate Poly Modeling
19:36
8. Back Shell and Head Plate
21:20

Project: Insectoid Soldier - Max

13 lectures
Part 1 (Retopology)
34:42
Part 2 (Initial Chest and Back Blockout)
52:46
Part 3 (Review of Blockout and Testing More Arms)
17:46
Part 4 (Torso and Hips Blockout)
20:47
Part 5 (Legs Blockout)
38:05
Part 6 (Legs and Arm Blockout)
42:53
Part 7 (Arm Refinement)
19:44
Part 8 (Back Refinement)
30:40
Part 9 (Torso Front and Hips)
27:42
Part 10 (Hand and Fingers)
29:35
Part 11 (Arm, Back, and Side Refinements)
25:41
Part 12 (Head)
37:39
Part 13 (Fingers, Legs, Chest)
38:57

Project: Cyber Soldier (Zbrush + Max + Blender +Plasticity)

7 lectures
1. Zbrush Initial Sculpt
25:39
2. Sculpt Helmet Refining
25:07
3. Blender Retopology 1
29:36
4. Max Retopology 1
37:35
5. Blender Retopology 2
31:19
6. In the Design Zone - Part 1
38:41
7. In the Design Zone - Part 2
26:43

Project: Soldier (Zbrush + Max + VRay)

11 lectures
Helmet 1
19:10
Helmet 2
16:11
Helmet 3
14:06
Helmet 4
17:55
Helmet 5
16:32
Helmet 6
21:10
Helmet 7
16:16
Helmet 8
17:52
Helmet 9
20:00
Helmet 10
14:54
Helmet 11
19:00

V-Ray Rendering

7 lectures
Introduction to V-Ray Rendering
29:32
Slate Material Editor
19:03
Procedural Texturing 1
15:00
Procedural Texturing 2
23:21
Procedural Texturing 3
16:51
Procedural Texturing 4
17:40
Frayed Rope Displacement
09:32

Next-Gen Workflows

14 lectures
Using Cki Vang's Excellent IMM Brushes
16:31
Monkey Bot 1 - Zbrush to CAD
37:58
Monkey Bot 2 - CAD to Zbrush
20:09
Kitbashing Demonstration
19:13
Synthetic Muscles Part 1
14:16
Synthetic Muscles Part 2
15:11
Synthetic Muscles Part 3
10:50
ProBoolean Dynamesh Workflow - Part 1
22:07
ProBoolean Dynamesh Workflow - Part 2
21:03
ProBoolean Dynamesh Workflow - Part 3
17:49
ProBoolean Dynamesh Workflow - Part 4
20:01
ProBoolean Dynamesh Workflow - Part 5
17:46
ProBoolean Dynamesh Workflow - Part 6
11:19
ProBoolean Dynamesh Workflow - Part 7
12:32

Mini Project: Wasp Pilot Helmet

4 lectures
Wasp Pilot Helmet - Part 1
33:34
Wasp Pilot Helmet - Part 2
39:09
Wasp Pilot Helmet - Part 3
01:00:38
Wasp Pilot Helmet - Part 4 (Rendering)
40:07

Project: Sculpting, Retopology, and V-Ray Rendering (Zbrush + Max + V-Ray)

9 lectures
Part 1
23:15
Part 2
23:05
Part 3
23:12
Part 4
18:04
Part 5
24:22
Part 6
25:27
Part 7
18:18
Part 8
20:35
Part 9
14:16

Đánh giá của học viên

Chưa có đánh giá
Course Rating
5
0%
4
0%
3
0%
2
0%
1
0%

Bình luận khách hàng

Viết Bình Luận

Bạn đánh giá khoá học này thế nào?

image

Đăng ký get khoá học Udemy - Unica - Gitiho giá chỉ 50k!

Get khoá học giá rẻ ngay trước khi bị fix.