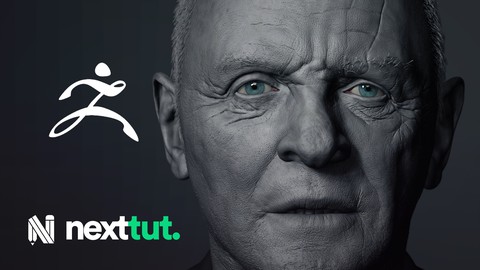
Zbrush Character Likeness Sculpting Tutorial
Loại khoá học: 3D & Animation
Anthony Hopkins likeness course: The only likeness course you will ever need to make any character more life like.
Mô tả
Are you looking for a course that explains the full process of sculpting a character likeness in ZBrush?
Would you like to better understand how I sculpt a realistic portrait, using just photo references and anatomical knowledge?
If this is the case, then I welcome you to Nexttut Education's "Zbrush Character Likeness Sculpting" course.
By the End Of This Course, You Will Be Able To:
You will be able make better character models then you are doing now. Your 3d characters will be more realistic looking.
What You Will Learn:
Proper Anatomy of the Face
Matching the face with the reference images
Realistic wrinkles and Skin detailing of the face
About Me:
My name is Victor Yamakado, I'm a 3d character artist with 10 years of experience in 3d art. I've been working for many years with Character Sculpting for collectibles and character modelling for production.
Who is This Course For?
This course is focused on Intermediate Zbrush users who really want to take their sculpting and perceptions skills to a next level.
What Are The Requirements Or Prerequisites For Taking This Course?
You should have prior working experience with Zbrush. This course is not for complete beginners.
You need Zbrush and a Graphic Tablet.
Description:
In this course, I want to share with you all the way I do for creating a complete and realistic portrait of Anthony Hopkins and make you fully introduced into this amazing journey of studying and recreating famous portraits. This surely is the most challenging skill that a 3d character modeller can have, once we needs to be always concerned on developing our perception and sculpting skills.
By sharing my process, I really want to make you open your eyes and take a whole new look at how do you perceive your references and how could you translate it in the sculpture process.
We will develop a stronger perception, by using many techniques for comparing distances, comparing a lot specific facial shapes and also understanding some of the most important features on the anatomical structures of the human face.
We will learn to identify these features in the reference and check if they are quite the same on the model. We start by building a pretty simple and generic basemesh, focusing on a good topology for doing portraits. Then we're gonna to sculpt firstly the Primary forms, capturing the overall likeness on volumes and silhouettes.
After we break the symmetries and we start the fun! We're gonna try to match even more the overall volume, but now we start to sculpt realistic skin wrinkles and folding on the face.
And finally, we'll cover my whole process of doing the surface details like skin pores or the Tertiary forms, as they are usually called. And for this, we will focus on using just the default alphas we have on Zbrush, this way everyone will be able to make an amazing realistic skin detail, blending and fully understanding how to apply each one of them.
Not satisfied yet? Moreover, we'll also cover how do I modelled, sculpted and detailed his cloths, how did I do his hair with fibermesh and also how to do a really nice polypainting on your model, even on a greyscale presentation, simulating skin tones and a realistic eyes painting.
Join Me Now:
So if you want to make a realistic environment, then join me now, and take your skills to the next level. Don't forget that investing in yourself will pay for the rest of your life. Hope to see you in the course.
Bạn sẽ học được gì
How to Sculpt Photo Realistic Character Likeness
How to Match Your Model with the Reference.
How to Make Realistic Skin Detailing in Zbrush.
How to Present Your work.
Yêu cầu
- You should have prior working experience with Zbrush. This course is not for complete beginners.
- You need Zbrush and a Graphic Tablet.
Nội dung khoá học
Viết Bình Luận
Khoá học liên quan


Đăng ký get khoá học Udemy - Unica - Gitiho giá chỉ 50k!
Get khoá học giá rẻ ngay trước khi bị fix.
Đánh giá của học viên
Bình luận khách hàng